The Ultimate Guide to the Blur Tool: How to Enhance Images & Protect Privacy
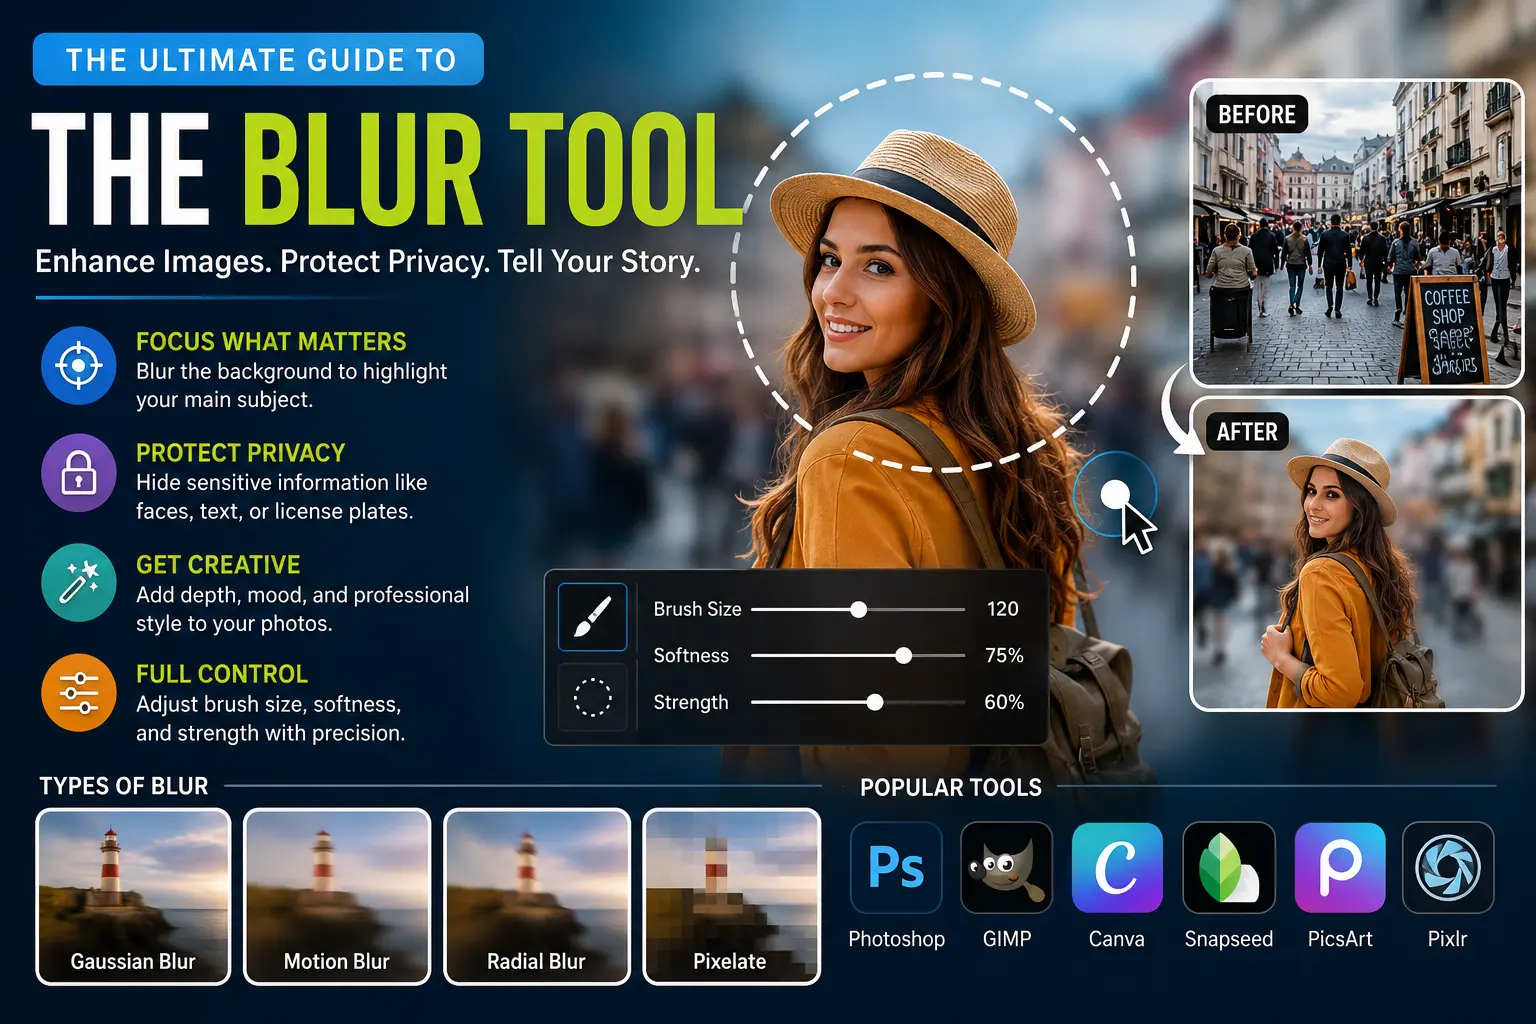
Whether you want to create shallow depth-of-field portraits or sanitize confidential client data before sharing visual documents, digital blur tools are essential. Modern blur tools provide precise pixel-level control over image clarity, allowing creators to isolate subjects, simulate motion, and permanently redact sensitive identifiers.
Key Takeaways
- Blur tool functionality: Blur tools obscure digital details by averaging color values across adjacent pixel clusters using mathematical convolution kernels like Gaussian distributions.
- Precise adjustment controls: Brush size, edge feathering (softness), and strength sliders let editors calibrate exact boundary intensity and blur radius.
- Privacy vs. aesthetic focus: Background blurring isolates primary subjects in photography, while targeted pixelation and heavy redaction protect personally identifiable information (PII).
- Diverse blur filters: Editors leverage Gaussian blur for uniform softening, Motion blur for directional speed, Radial blur for rotational focus, and Pixelation for irreversible redaction.
- Non-destructive workflow: Professional editing requires duplicating base layers or utilizing non-destructive layer masks before applying irreversible blur filters.
- Live automated protection: In browser workflows, automated client-side extensions eliminate manual screenshot editing by masking credentials in real time.
What Is a Blur Tool and How Does It Work?
A digital blur tool is an image processing feature that softens contrast and diminishes fine detail by calculating the weighted average of adjacent pixels. The mathematical engine behind standard blur tools is the Gaussian blur convolution algorithm, which applies a two-dimensional bell-curve distribution to blend neighboring pixel values. By reducing high-frequency spatial variation across an image, sharp edges, textual glyphs, and identifiable facial features become smooth and unreadable.
Most modern desktop editors and web applications implement the blur tool in two distinct modalities: brush-based local painting and layer-wide parametric filters. In brush-based editing, you select a designated tip radius and stroke over specific coordinates to manually distribute pixel blending. When using parametric filters, the algorithm processes the entire selected region uniformly based on a set pixel radius (such as a 15px Gaussian blur radius).
For example, web editors like Pixlr and Canva let users adjust brush radius, feathering softness, and opacity strength before dragging across sensitive numbers on an uploaded invoice. Similarly, full creative suites like Adobe Photoshop and GIMP allow editors to convert assets into Smart Objects, ensuring that any applied blur filter can be modified or disabled without permanently destroying original pixel data.
Understanding how pixel averaging operates under the hood is critical for digital privacy. If you frequently handle screenshots containing customer emails or API tokens, mastering the blur tool ensures that sensitive data is eliminated before graphics are distributed online or archived in public documentation.
Why Should You Use a Blur Tool in Photo Editing and Privacy Protection?
The primary creative advantage of a blur tool is establishing visual hierarchy and directing audience attention. In portrait and product photography, blurring cluttered backgrounds simulates the shallow depth-of-field achieved with wide-aperture camera lenses. This aesthetic technique separates the sharp subject from ambient noise, making complex scenes feel clean, balanced, and professionally composed.
Beyond artistic enhancement, the blur tool plays a decisive role in cybersecurity and compliance. When creating product walkthroughs, software demos, or customer support documentation, unmasked screenshots frequently expose API keys, email addresses, credit card numbers, and physical addresses. Applying blur masks ensures that documentation meets regulatory privacy standards like GDPR, HIPAA, and CCPA.
Furthermore, blur acts as a storytelling cue in graphic design. By softening irrelevant background interfaces, you guide viewer eyes toward vital call-to-action buttons or instructional highlights. To learn how to protect your workflows across diverse operating systems, review our in-depth screen privacy and data protection techniques.
When developing privacy tools, one major vulnerability we observe is under-blurring. Because Gaussian blur is a deterministic mathematical convolution, low-radius blurs on standard typography can sometimes be reversed using machine learning deblurring models and optical character recognition (OCR). If you are redacting sensitive credentials or government IDs, never rely on a faint 3px Gaussian blur. Always apply high-radius blurring, pixelation quantization, or opaque solid vector redaction.
Need automated browser & screen blurring?
Stop manually editing screenshots. Discover how the real-time screen blurring tool automatically masks credentials during live presentations.
How Do You Apply a Blur Tool to an Image (Step-by-Step)?
Applying a blur tool effectively requires a structured workflow that preserves image quality while achieving total visual obscurity where needed. Follow this standard five-step process across desktop and online editing applications:
Open Your Image in an Editing Environment
Import your target asset into your chosen editor (such as Photoshop, GIMP, Pixlr Express, or Canva). Before applying any modifications, duplicate your background layer into a dedicated working layer to ensure a completely non-destructive editing workflow.
Select the Blur Tool or Filter Type
Navigate to your editor’s tool palette or filter menu. In Adobe Photoshop, select the Blur Tool from the left toolbar or open Filter > Blur > Gaussian Blur. In online editors like Pixlr, select the Retouch panel and choose the Blur brush.
Calibrate Brush Size, Softness, and Strength Settings
Adjust your brush dimensions to match the target element. Configure Brush Size to encompass the area, adjust Softness / Feathering to ensure seamless transition edges, and set Strength between 60% and 100% depending on whether you want gentle background softening or total text redaction.
Apply the Blur Over Target Regions
Carefully brush over sensitive data, background clutter, or faces. Apply multiple passes if redacting text to eliminate character legibility. For broader areas, use a marquee or lasso selection tool and execute a single high-radius Gaussian filter pass over the isolated selection.
Inspect at 100% Zoom and Export
Zoom to 100% actual resolution to verify that no residual characters or identifiable geometry remain recognizable. Once validated, flatten the layers to bake the blur permanently into the pixel matrix, then export the file in your preferred format (PNG or WebP).
If you are preparing visuals for live meetings or recordings, check out our companion tutorials on recording your screen safely on any device and safe screen sharing best practices.
What Are the Different Blur Effects and Algorithms?
Modern graphic design applications support several distinct blur algorithms, each engineered for specific creative or security outcomes:
- Gaussian Blur: A mathematically symmetrical blur that calculates pixel weights using a normal bell curve. It generates a smooth, uniform out-of-focus effect with no directional distortion, making it the industry standard for background softening.
- Motion Blur: A directional filter that smears pixels along a specified linear angle and distance. Motion blur simulates physical camera shutter exposure on moving objects, adding velocity and dynamic action to static vehicles or athletes.
- Radial / Iris Blur: A circular blur effect that maintains crisp sharpness at a designated focal center while increasing blur intensity toward outer radii. It is frequently employed to emphasize a central person or subject.
- Lens / Bokeh Blur: An optical simulation filter that models real camera diaphragm apertures. Lens blur transforms out-of-focus background light sources into soft circular or polygonal bokeh highlights.
- Pixelation (Quantization): A censoring effect that downscales the target region into large solid-color blocks. Pixelation destroys gradient transitions entirely, making it ideal for irreversible redaction.
Comparison Table: Digital Blur Effects vs. Censoring Filters
This comparison table summarizes the primary visual characteristics and recommended applications for each blur algorithm:
| Effect Type | Algorithm Mechanism | Optimal Use Case |
|---|---|---|
| Gaussian Blur | Normal distribution pixel averaging | Portrait backgrounds, skin smoothing, subtle softening |
| Motion Blur | Linear angle directional streaking | Action sports photography, moving vehicles, speed lines |
| Radial (Iris) Blur | Centroid-anchored gradient feathering | Vignette focusing, circular subject framing |
| Lens / Bokeh | Aperture diaphragm highlight expansion | Artistic night photography, cinematic lighting depth |
| Pixelation | Grid spatial color quantization | High-security credential masking, face & license plate redaction |
How Can You Blur Specific Areas (Faces, Text, Backgrounds)?
Isolating target elements before applying blur prevents unintentional degradation of the main subject. In desktop suites, you can outline license plates, faces, or text fields using the Polygonal Lasso or Rectangular Marquee Tool, apply a 2px feather to the boundary, and execute the filter only within the selection.
When blurring text within documents, ensuring adequate radius intensity is paramount. Standard alphanumeric characters remain recognizable under a slight 3px blur because the brain infers letters from surrounding word contours. To guarantee unreadability, increase the blur radius to at least 15px–25px or replace the text segment with a pixelation mask.
For background separation, create a subject mask using AI selection tools (such as Photoshop's "Select Subject"). Invert the selection mask so that only background coordinates are targeted, then apply a Lens or Gaussian blur filter. For comprehensive step-by-step techniques, refer to our comprehensive guide to blurring photos.
Blur vs. Pixelation: Which Should You Use When?
Choosing between smooth blur and pixelation depends strictly on your objective: aesthetic refinement vs. absolute information destruction.
Choose Gaussian / Lens Blur when aesthetics matter: If you are creating social media graphics, product hero banners, or artistic portraits, smooth blur maintains organic lighting gradients and preserves the visual balance of the image.
Choose Pixelation or Solid Redaction for strict privacy compliance: If you are publishing financial statements, medical records, or user accounts, pixelation quantizes data into discrete blocks, ensuring no gradient clues remain for automated optical decoders.
What Common Mistakes Should You Avoid When Using Blur Tools?
Faint blur filters leave discernible font shapes that AI models can decipher. Always zoom to 100% resolution to confirm zero legibility.
Blurring directly on your original image layer prevents future revisions. Always duplicate layers or use layer masks.
Hard selection boundaries create unnatural halos around subjects. Always apply a 2px to 5px feather to selection edges for natural blending.
Exporting PDFs with editable layers can allow recipients to disable blur overlays. Always flatten assets before public release.
Which Software and Apps Offer the Best Blur Tools?
Depending on your device and operational demands, several reliable software solutions provide advanced blur capabilities:
Desktop Creative Suites
Adobe Photoshop offers the most comprehensive Blur Gallery (Tilt-Shift, Iris, Field) alongside manual brushes. GIMP delivers open-source Gaussian, Motion, and pixelate filters with zero subscription fees.
Online Web Editors
Pixlr Express provides responsive brush sliders for fast image touch-ups in your browser. Canva features automated background blur sliders for marketing graphics.
Mobile Photography Apps
Snapseed (Google) includes precision Lens Blur with tactile touch gestures. PicsArt and iOS Portrait Mode allow depth re-focusing after photos are captured.
Real-Time Privacy Extensions
AI BlurWeb provides client-side automated PII masking across web browsers, protecting passwords and emails during live presentations and recordings.
Next Steps: How to Master Blur in Your Workflow
To expand your digital editing and visual security skills, implement these practical habits:
- Practice layer masking: Master painting blur on black-and-white layer masks rather than applying destructive direct filters.
- Audit sensitive document exports: Always test redacted screenshots against zoom inspection to ensure unreadability before publishing.
- Explore real-time masking: For live broadcasts and video recordings, explore our dedicated guide to blurring sensitive screen areas.
- Check pricing and licensing: Review our pricing and lifetime license options to secure automated browser blur protection.
- Read community FAQs: Visit our frequently asked questions for additional security guidance.
Conclusion
Mastering the blur tool empowers you to transform ordinary visual assets into professional compositions while safeguarding sensitive information. By understanding the differences between Gaussian, motion, and pixelation algorithms, practicing non-destructive layer techniques, and selecting the right tools for your platform, you can enhance image aesthetics and maintain ironclad privacy across all visual communications.
Written & Reviewed by Deepak (Founder)
Founder & Solo Developer at AIBlurWeb
Deepak builds privacy-focused browser tools and writes about screen privacy, browser security, sensitive-data protection, screen sharing, and AI-powered privacy tools. Read more about the founder →
Disclaimer: This article was initially drafted with AI research assistance and thoroughly revised, fact-checked, and validated by human editors and security subject matter experts.